
Recently, I started experimenting with the Ultimaker+ extended 3D printer that we’ve got into our office as part of the digilab. I was very excited and enjoyed every little detail about it, from unpacking to assembly, to then making something out of it. As it happens that after a week of getting the printer, I was participating in the NFSUN (the Nordic Research Symposium on Science Education) conference to disseminate our work in the AR-Sci project. I thought it could be a great idea to show some of the 3D models we produced for the project in a new and different way. Throughout the project we produced a collection of interactive Augmented Reality experiences for science education, and 3D printing can be also great way to visualize things we don’t see normally with the naked eye. 3D printing enables you to bring your digital 3D representation into your real world as a tangible object.
In this blog post I will talk about my first print using the Ultimaker + extended and how I prepared the 3D model to be printable with other tips to fix yours easily.
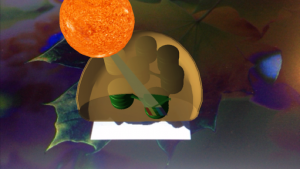
I chose randomly to print a 3D model of chloroplast which you can see in the image below. This is a screen shot of the chloroplast model as part of the Augmented Reality experience.
Getting started with a new 3D printer means using a new software, Cura. Cura is a slicing software maintained by Ultimaker. It prepares your 3D model by slicing it into layers to create a file known as G-Code which speaks the language of the 3D printer.
However, some 3D models need to be prepared before you bring them to the printer software as not all 3D models are ready to be printed straightaway. There are a set of criteria that need to be met to make your 3D model
printable.
There are two approaches to fix a 3D mesh; manually, or automatically.
For a quick fix, I recommend using this software that enable you to validate your 3D model, fix and convert it to the right format before sending it to printer. Meshlab, and Netfabb are the ones I used in several situations to prepare my 3D models, and I found both of them very easy and quick to use.
MeshLab:
- 3D model need to be in .stl format: you can use MeshLab to convert your design files from any format to .stl.
- Polygon reduction: It is advised that the files you need to print should be under 64 mb in size and have less than 1,000,000 polygon (triangles) faces: if your 3D model is larger than that, you can use MeshaLab for polygon reduction.
Netfab:
- Netfab software can be very useful when checking your model very accurately and analyze all its features before you send it to a 3D printer.
- I also found Netfab very useful to scale your 3D models to real world measurement.
- The mesh needs to be closed, no gaps or wholes between faces and edges and Netfab can help you fix that using the automatic repair tool.
To fix the Chloroplast 3D model, I decided to prepare it manually using 3D modelling software called Blender :
- Each 3D model needs to be a single seamless mesh:
- Looking at the model, it can be printed in two different pieces that will eventually be put together and glued. This allows me to print the whole model in two different colors as well.
- Wall thickness:
- One thing to look for is that the wall thickness of the model needs to be above the minimum. This is an issue I had with the outer piece of the model. I had to increase its wall thickness by using the solidify modifier making sure that this doesn’t affect or change the shape of the model.
- Last step was to look for holes in the model,
- then convert it to .STL.
It is worth noting that Blender already has an add-on called 3D print toolbox which you can load it from blender preferences menu. This tool checks for
issues in your model like intersecting faces, distorted faces and thickness and over hanging before printing.
A final check for the model is always good by using Mesh Analysis panel which generate a heatmap of the problematic areas.
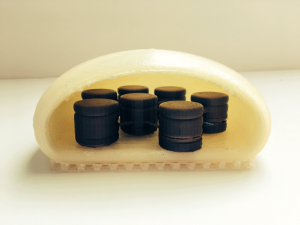
Finally, below is the end result of my model which I am very proud of. What I like about 3D printing is that you can rapidly prototype your design, visualise, and share it with other people who can test it or use it to stimulate a conversation around ideas or in facilitated lessons.